
How to Send Automated Email Reminders (Easiest Way 2024)
In this article, we will show you how to send automated email reminders in just a few simple steps using a spreadsheet. Simply follow the process below!
How to Send Automated Email Reminders
Follow the steps below to send automated email reminders.
1. Prepare a Google Sheet and Copy It’s URL
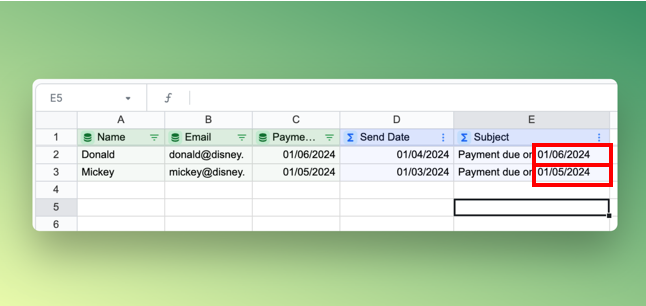
Make sure your Google Sheet is formatted like the example below:
- The data should be tabular (no blank rows nor blank columns separating your data.
- Column headers should be in the first row with no special characters or line breaks
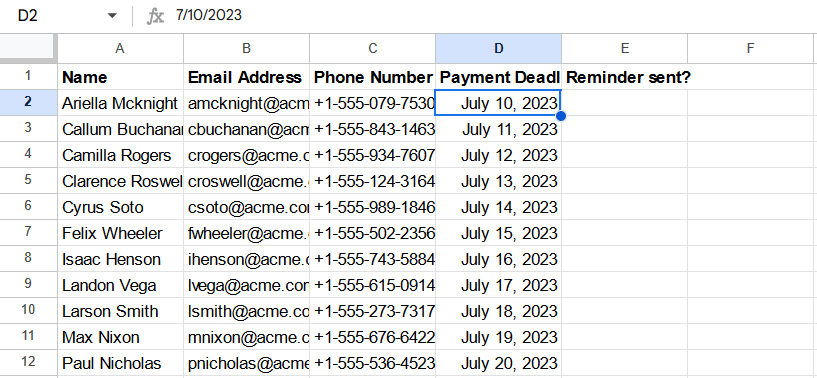
Make sure your data is formatted in a tabular fashion as seen above
Copy the URL for your Google Sheet
2. Connect Google Sheet to Lido
- If you don't have a Lido account, you'll need to create one for free at: http://www.lido.app/go/signup
- Lido offers premium spreadsheet formulas and automations not offered in Excel or Google Sheets, like SENDGMAIL() and SENDOUTLOOK(), which we'll use to send out our emails
- Create a new file, then click on the green Connect Data button
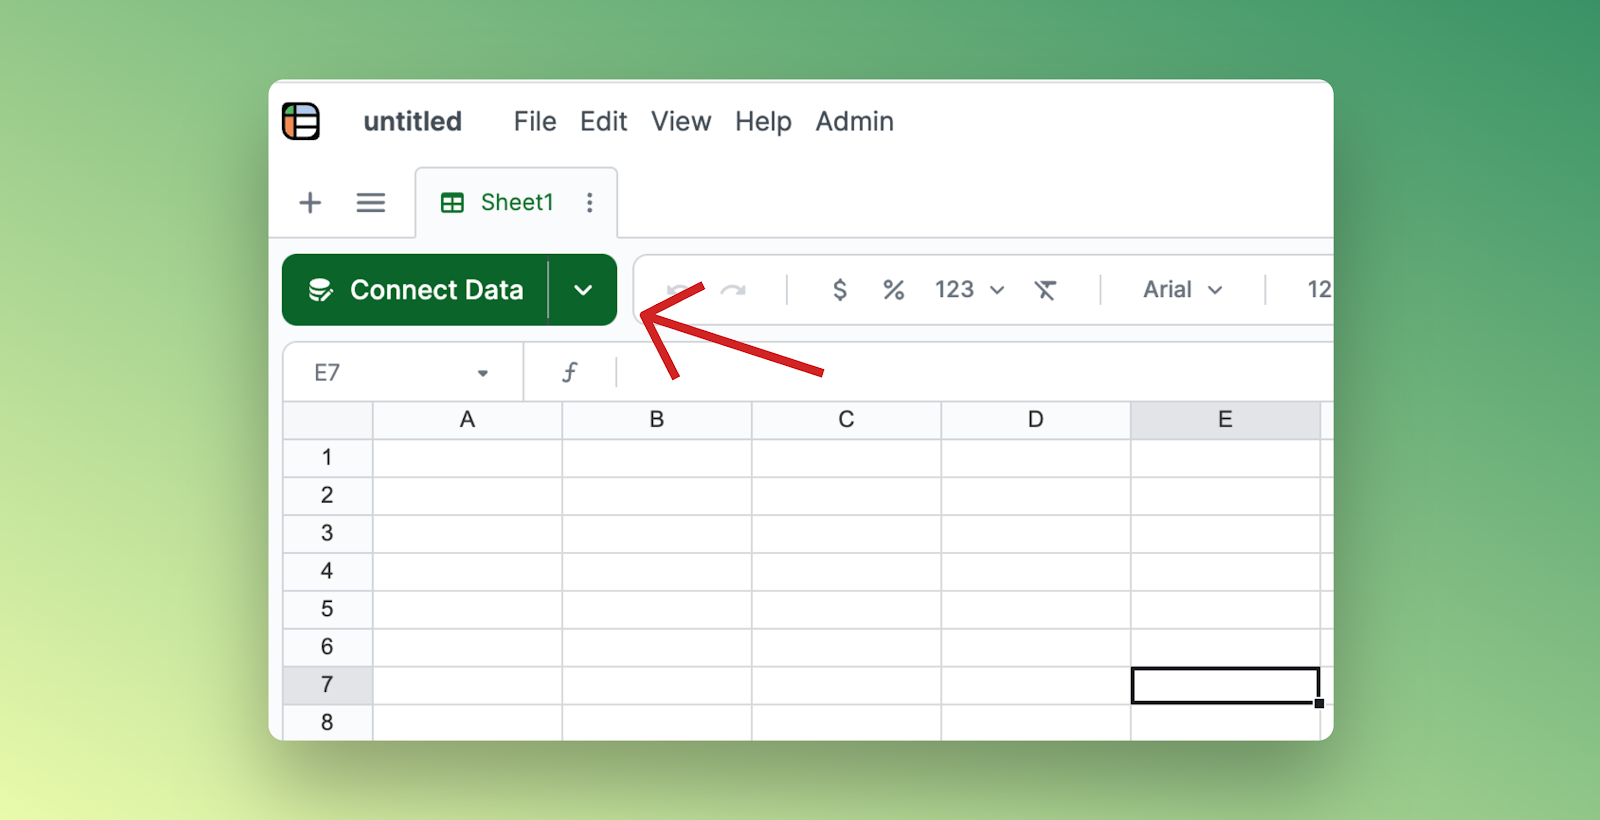
- Select Google Sheets from the list of integrations
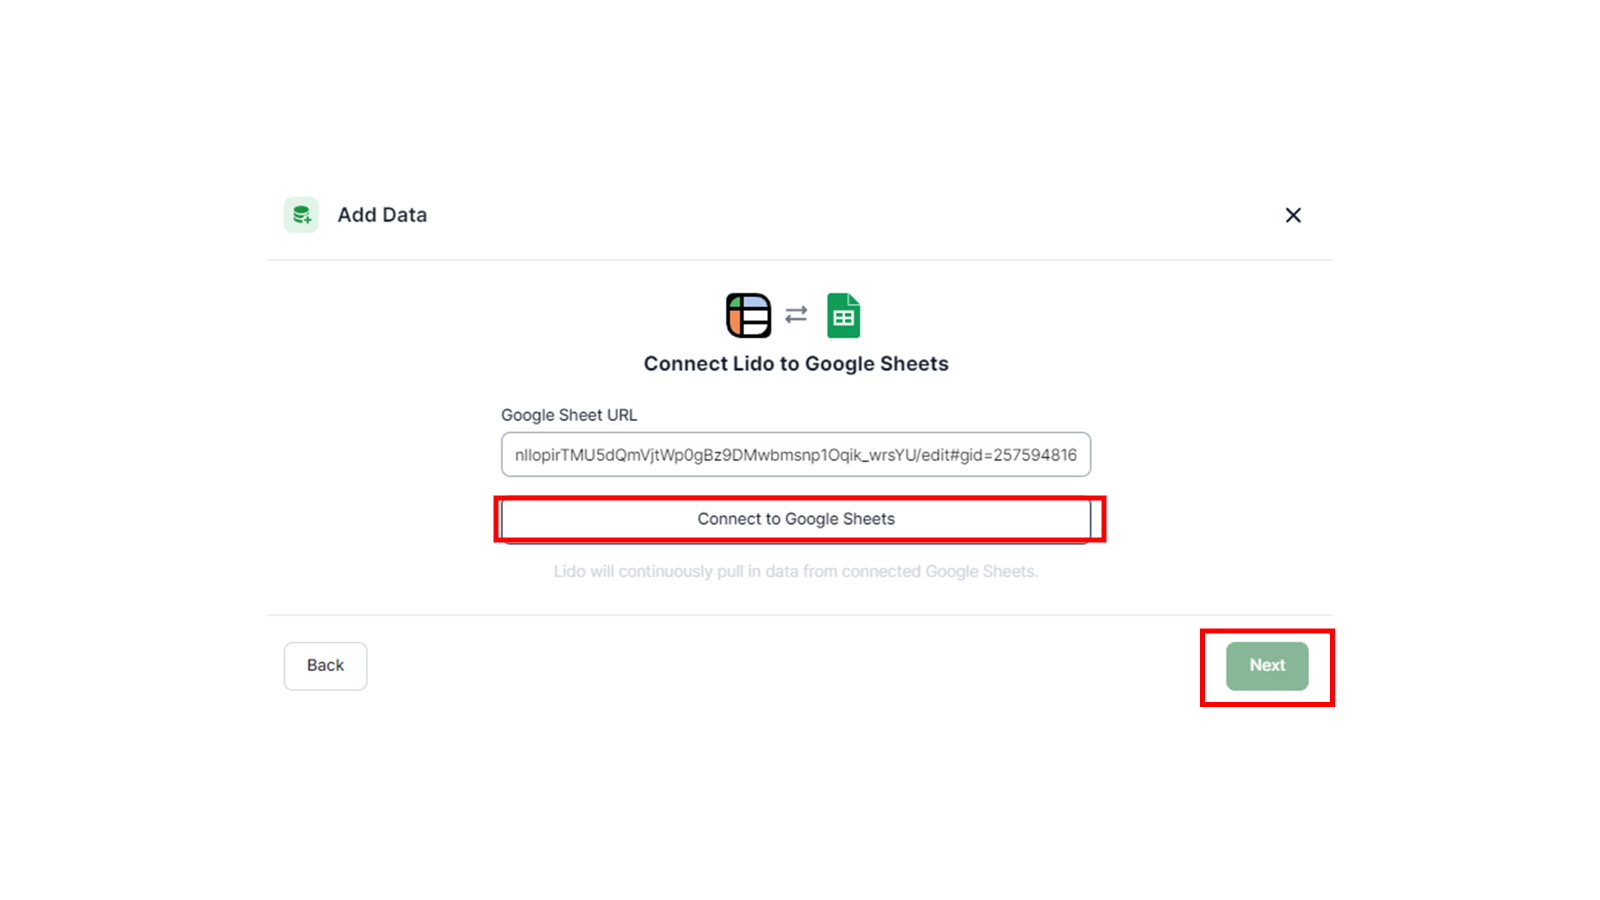
- Paste your Google Sheet URL into the text box
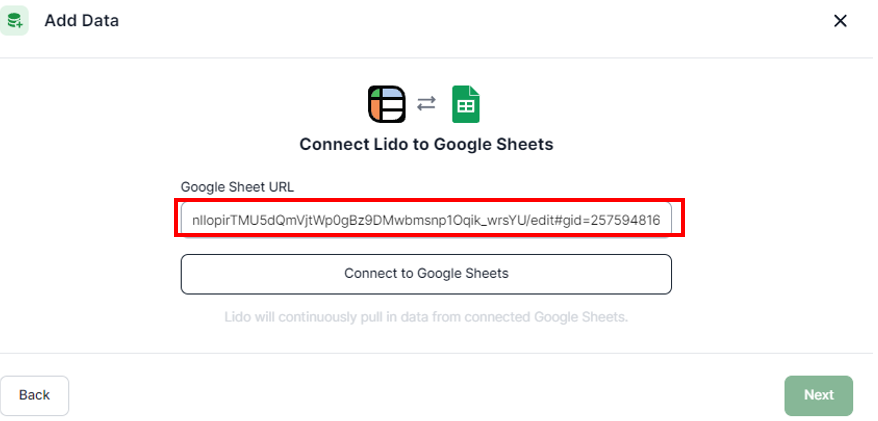
- After pasting the URL, click Connect to Google Sheets. You will get a message saying 'Successfully connected to Google Sheets’. Click Next.
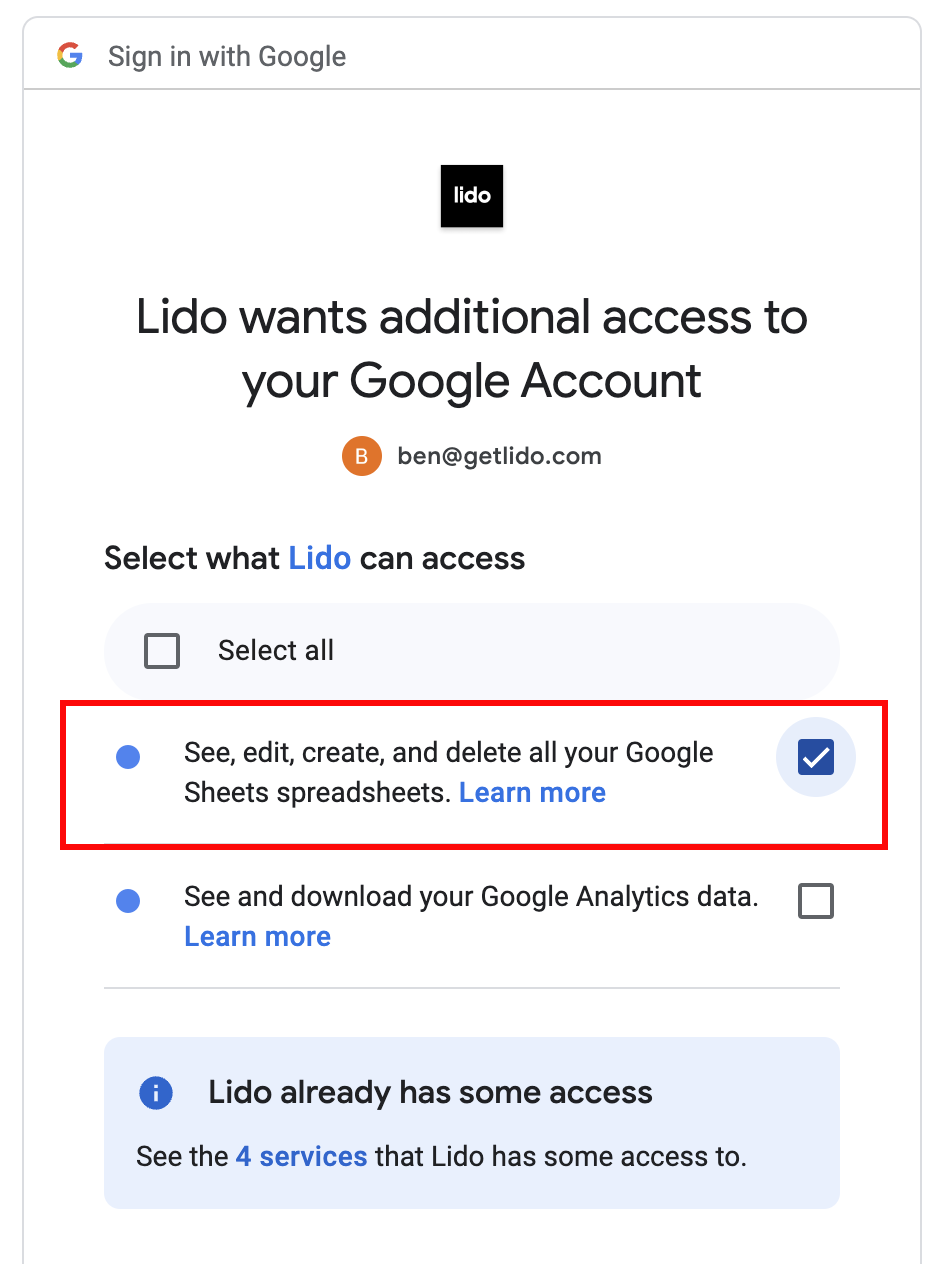
- The first time you connect to Google Sheet, you will be asked to log in to a Google Account that has access to the Google Sheet. Make sure to toggle on the necessary permissions:
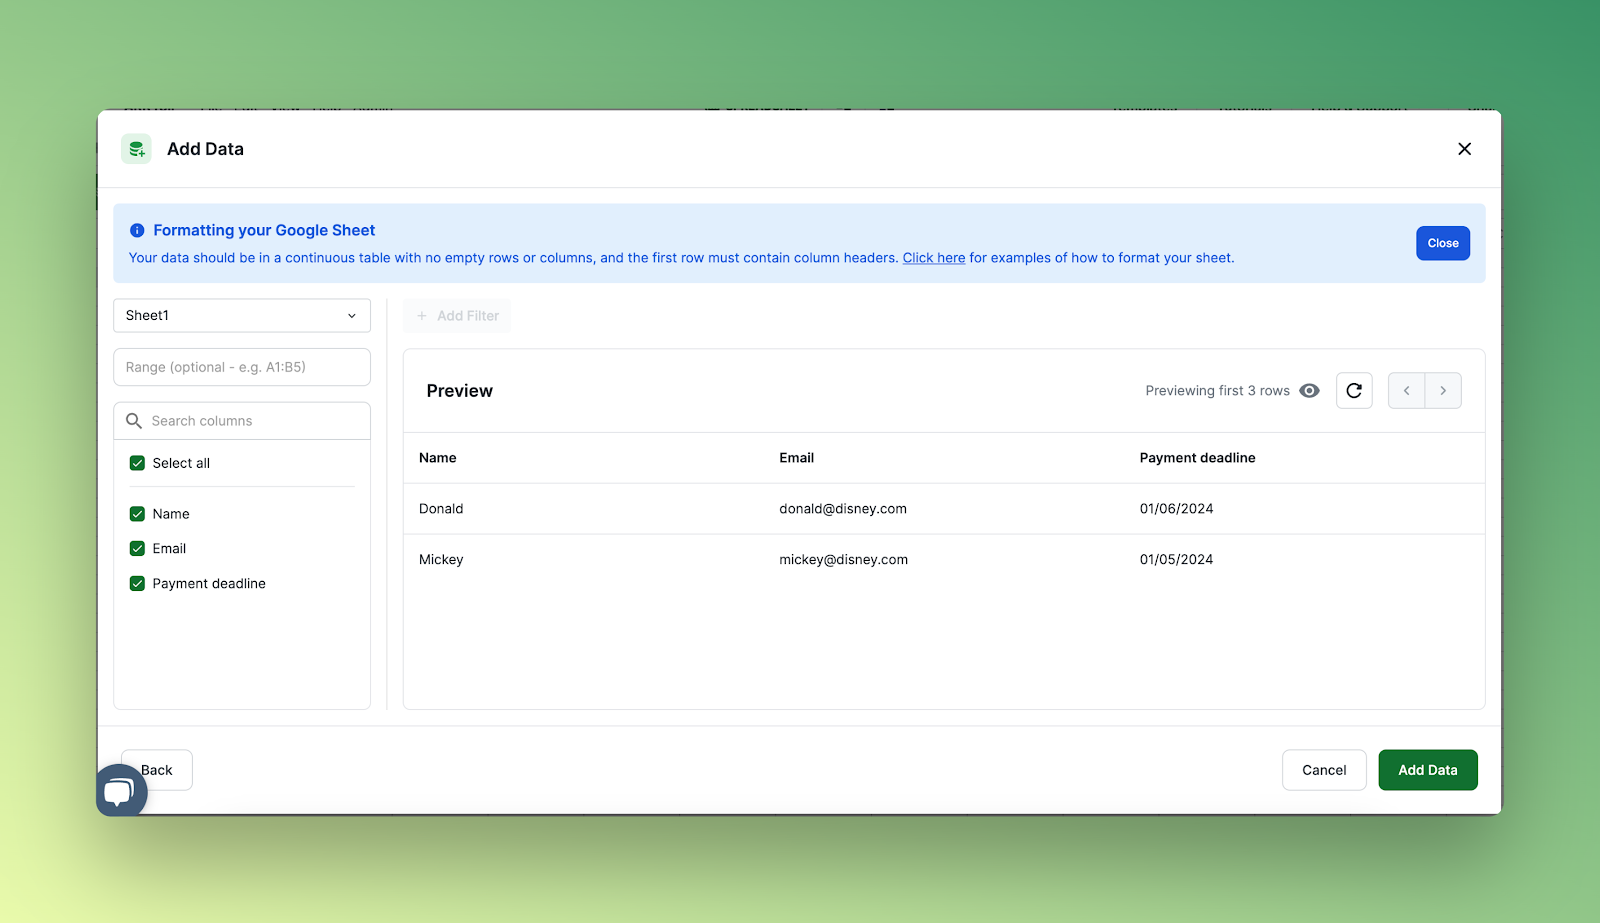
- Select the columns that you want to pull into Lido. Then click Add Data. In this case, we want to bring in all the columns.
Note: Renaming or deleting columns from within your Google Sheet can interrupt the connection to Lido. If this happens, in your Lido file click on "Edit Data" to reselect the correct Google Sheet data columns to pull in.
3. Add a Column Calculating Reminder Dates
For our example, we will send reminders two days before the Payment Deadline.
- We'll use a formula to calculate the reminder date (let’s do 2 days before the Payment Deadline Date): =Payment Deadline Date - 2
- Where Payment Deadline Date is the cell that contains our deadline. In our example, our deadlines are stored in column C. So the deadline of the first row is in C2.
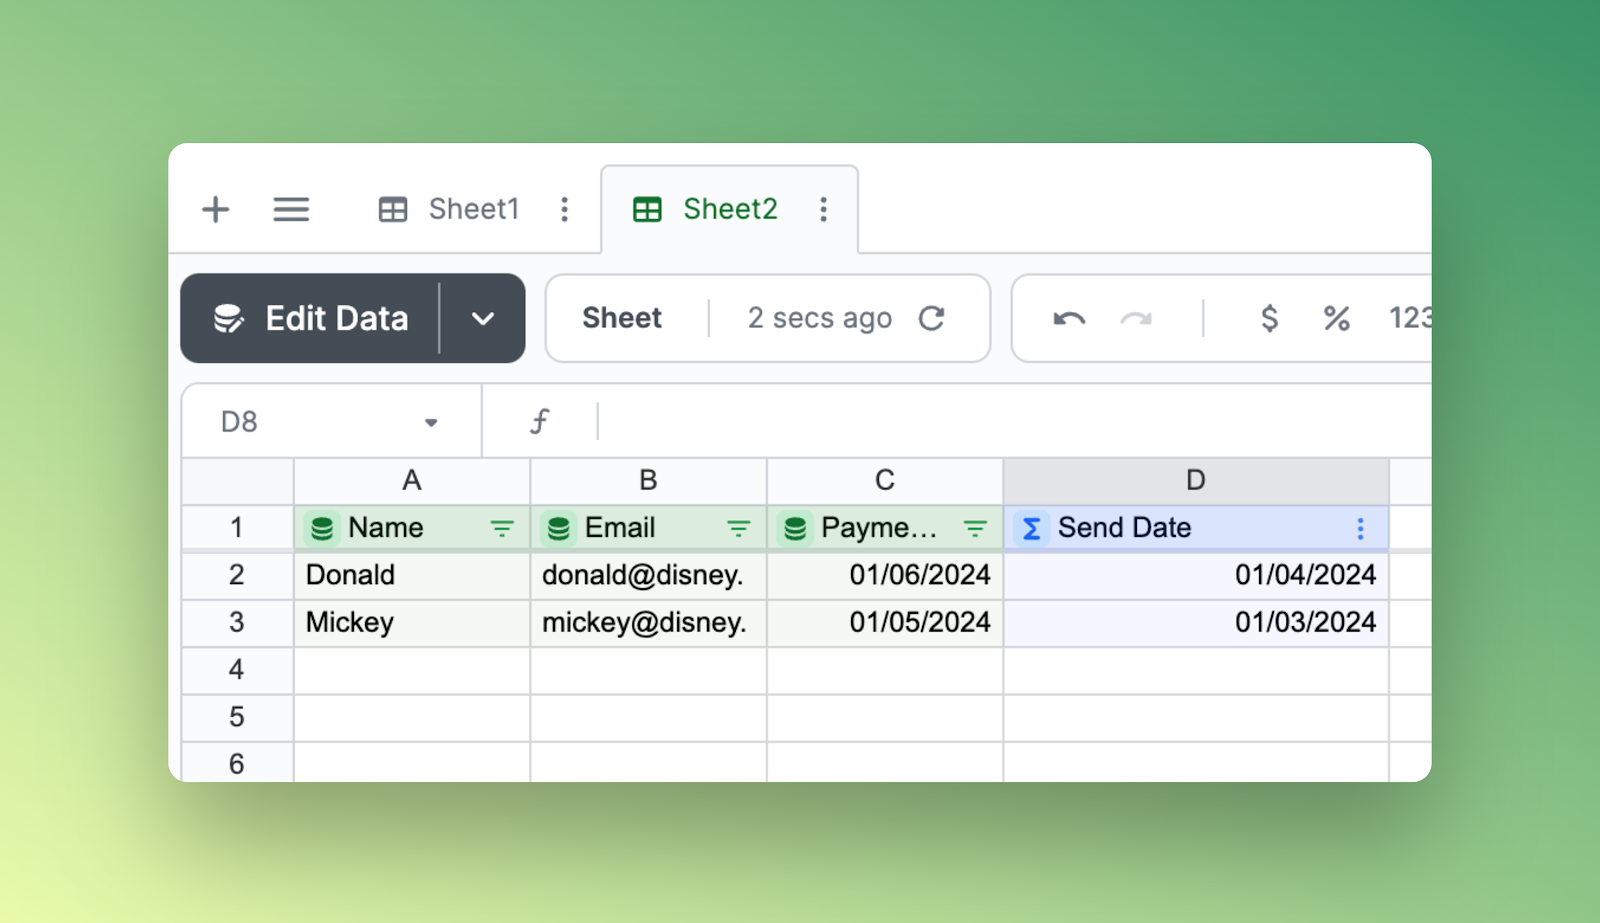
- In our example, we will put the following formula in the row 2 cell of the blank column right next to our connected Google Sheet data (cell D2):
```=C2-2```

- Hit enter to create a computed column. Computed columns are special columns created when you enter a formula right next to a table of data in Lido. These columns automatically apply your formula to every row in your dataset, with the correct cell references.
- We can name this column Send Date. Double click on the header cell (row 1 cell) of the column to rename it.
4. Create the Subject and Body of the Automated Email Reminders
We are now ready to create the subject and body of the automated email reminders.
Create Email Templates
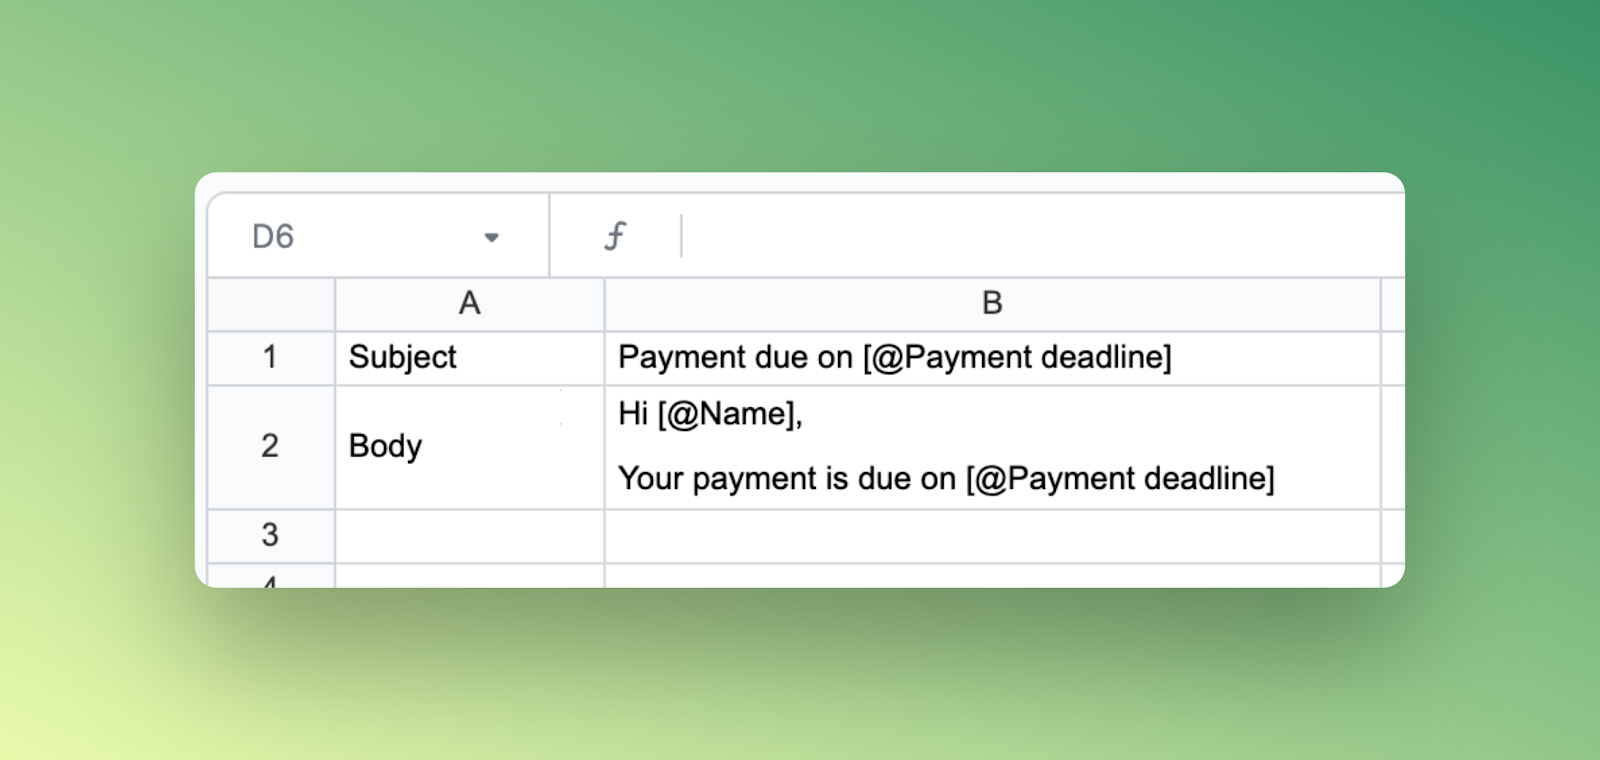
- We will create subject and body email templates using our table column names as variables, by referencing them with [@Column] syntax
- Set up templates for the email subject and body in a new tab like this (we recommend using the blank Sheet 1 tab that comes in every Lido file):
Now that we’ve made our email templates, we need to use them to actually create the personalized email subject and bodies for each of our data rows. We'll do that by creating two new computed columns for both Subject and Body. Then, we’ll use a formula called STRINGTEMPLATE() inside of the computed columns.
- Go back to the Lido tab with your data table
- Type “Subject” in the header cell (row 1) of the first blank column to the right of your table. Press enter. A pop-up menu will appear. Select Computed Column.

- Add this formula to row 2 of the Subject column:
```=STRINGTEMPLATE(Sheet1!$B$1)```
- When you press enter, the formula will be applied automatically to every row in your dataset. That is the beauty of the computed column!
Remember to anchor your STRINGTEMPLATE formula
In our example, Sheet1!$B$1 is the location of our email subject template. Make sure you replace this with the cell holding your template if different. Anchor the cell reference with $ signs, as all rows will use the same template cell.
- STRINGTEMPLATE replaces column references in your template with the values a row has for those columns. In our example, notice how the payment deadline in each row’s email subject is personalized based on the contents of column C (labeled Payment Deadline).
- Repeat the process for the email body of each row. some text
- Go to the next blank column (in our case column F)
- Type Body in the header cell (row 1 cell). Press enter
- Select computed column in the pop-up menu that shows up
- Enter the formula below in row 2 of your Body column. Remember to change the cell reference to be your cell holding your email body template. Make sure to anchor the cell reference with $
```=STRINGTEMPLATE(Sheet1!$B$2)```
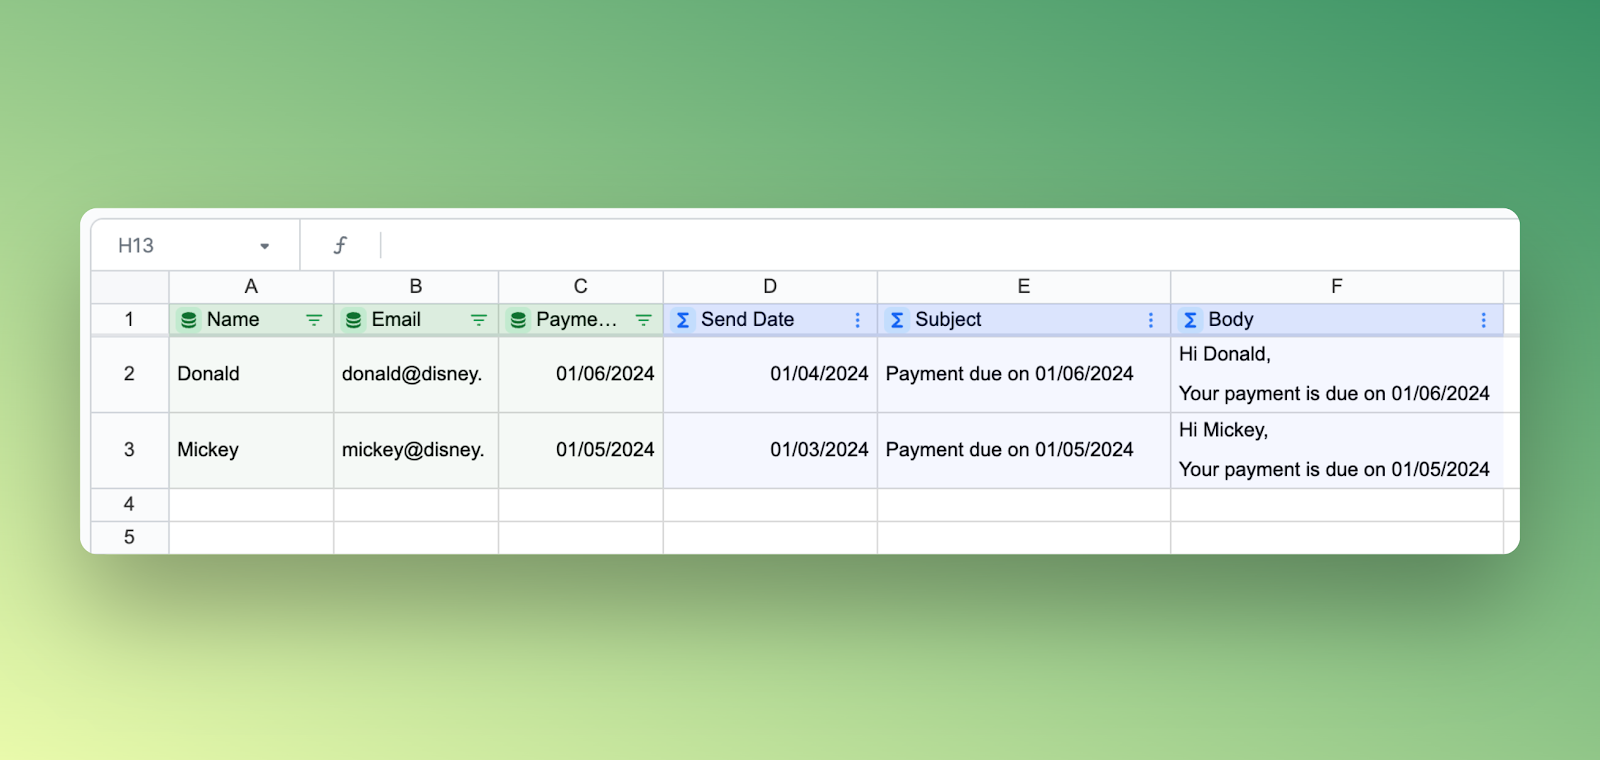
Your data table in Lido should now look like this:
5. Make a New Column for the SENDGMAIL() or SENDOUTLOOK Formula
Unlike Google Sheets, Lido's spreadsheet has a special type of formula called Action Formulas. SENDGMAIL and SENDOUTLOOK are Action Formulas that send emails. In this case we will use SENDGMAIL.
SENDGMAIL works as follows:
=SENDGMAIL(sender_email_credential, recipient_email, subject, body, [status_cell], [cc], [bcc], [attachment])
Where:
sender_email_credential: your sender email account (e.g., your@email.com) that we will connect to
recipient_email: the email of the person that will receive the automated email reminders
subject: the email subject
body: the email body
In our example, the core SENDGMAIL formula looks like:
```=SENDGMAIL(<sender_email_credential>, B2, E2, F2)```
Connect to Your Sender Email by Adding a Credential
You'll need to add a credential to connect your Gmail (or Outlook) account to Lido. To do this, start typing =SENDGMAIL(.
When you're in the first argument of =SENDGMAIL(), click on the "+Add credential" button to connect to your Gmail sender email address. The GIF below shows how to do this:
Make sure to follow the connection flow and grant the necessary permissions so Lido can send automated email reminders on your behalf from your sender email address.
Note: your SENDGMAIL formula should be in the row 2 cell of the next blank column right of your data table. For our example, this will be G2.
Add Logic for When Automated Email Reminders Should be Sent
We want to have SENDGMAIL display / run for a row only when today's date equals the row’s reminder Send Date. So, we’ll add an IF statement around SENDGMAIL:
```=IF(TODAY() = reminder_send_date, SENDGMAIL(<sender-credential>, recipient, subject, body))```
The formula works as follows:
If today's date is equal to the reminder_send_date of a row, then SENDGMAIL will display for that row and it will run for that row when our automation runs (keep reading!) - otherwise we display FALSE and no email will be sent.
Created a New Computed Column
Let's create a new computed column, and enter our final SENDGMAIL formula in row 2 of that column (again, for our example this will be cell G2).
```=IF(TODAY() = D2, SENDGMAIL(“your@email.com”, B2, E2, F2))```
Press enter. The formula will be automatically applied to each row of our data table.
We can double click on the header (row 1) cell, and rename the column as Send Reminder.
Note:
D2 is the reminder date (in our example Send Date) of row 2
“your@email.com” is our sender_email_credential
B2 is the cell holding the recipient_email for row 2
E2 is the cell holding the personalized subject for row 2
F2 is the cell holding the personalized body for row 2
Note: remember to use your own sender_email_credential for your own sender email address and use the correct cell references for the rest of the arguments

As you can see, the SENDGMAIL formula is only visible for rows whose Send Date column values = today’s date. For all other days it displays FALSE. We’re almost done!
Test SENDGMAIL
Right click on a visible SENDGMAIL formula and click "Run Action" to send the email.
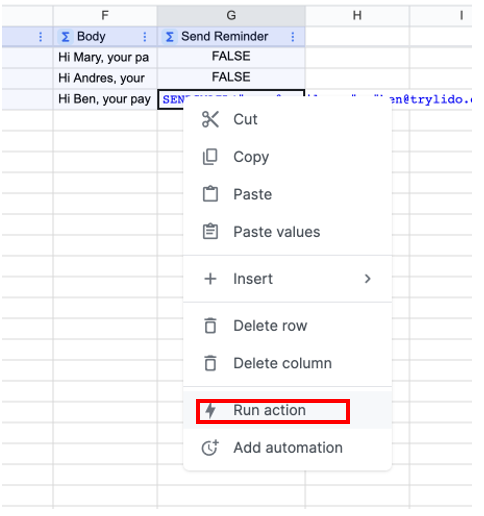
Right click on a visible SENDGMAIL action formula and select Run action to test send an email
If everything is set up correctly, you’ll see an “Action run successfully” notification on the bottom right of your file. It looks like this:

Note: you can double check the email went out by going to your sender email address’s outbox and check that the email was sent.
6. Implement an Automation to Send Automated Email Reminders
Now, for the fun part. We can automate the running of the Send Reminder column. For rows where SENDGMAIL is visible in the column (i.e., rows whose Send Date = today’s date), Lido will automatically run the SENDMGAIL action formula - even if the file is closed or you are logged out!
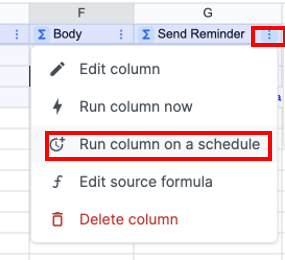
Click on the 3 dots of the Send Reminder header (row 1) cell and select Run column on a schedule.
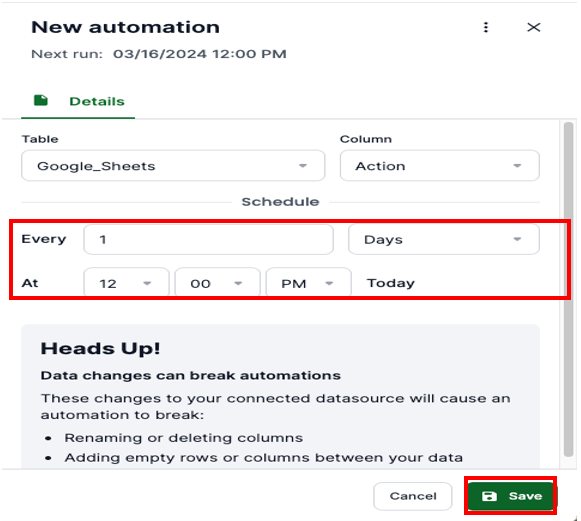
An automation panel will show up. Select the interval you want the automation to run on and press Save. For reminder emails, we suggest having the automation run once per day at your desired time.
Note: everytime the automation runs (say every day at 12PM), Lido will do the following things:
- Pull any new rows from your Google Sheet
- Update the Lido spreadsheet cell values to depict the current state of your Google Sheet
- Send automated email reminders for the rows who require one be sent out (i.e., for the rows whose Send Date is equal to today)
…even when the file is closed or you are logged out. So, once you set the automation you can close the file and no more work needs to be done!

Click here to get started with Lido and start sending automated email reminders directly from your spreadsheet!
We hope that you now have a better understanding of how to send automated email reminders. If you enjoyed this article, you might also like our article on how to automate Slack messages and how to set up an automated lead follow up system.