
It is very common for your datasets in Google Sheets to have cells that you change to indicate product movement, updates and other things you want to keep track of. If you want to be able to send emails when you change a cell value, here is a simple guide for you to do so.
Note that this method uses Lido to detect changes and to trigger a send email function.
In this example we will automatically email a team member once the status of their task is changed from “FALSE” to “TRUE”. You can substitute in your own values as you follow along.
For this example, we want to be able to send email messages to a team member when we update their task status from FALSE to TRUE.
Your Google Sheet data should be arranged in a table with no empty rows or spaces. The first row should be your column headers, which cannot have special characters or line breaks.

Lido is a new spreadsheet built for automation that is fully compatible with Google Sheets. You can create a free account at https://www.lido.app/go/signup.
We will use Lido to send emails when any of our cells change from FALSE to TRUE.

Click on the green Connect Data button in the upper left corner, then click Google Sheets.

Paste in your Google Sheets link you created earlier and click next. You will need to connect to a Google account that has access to the spreadsheet.
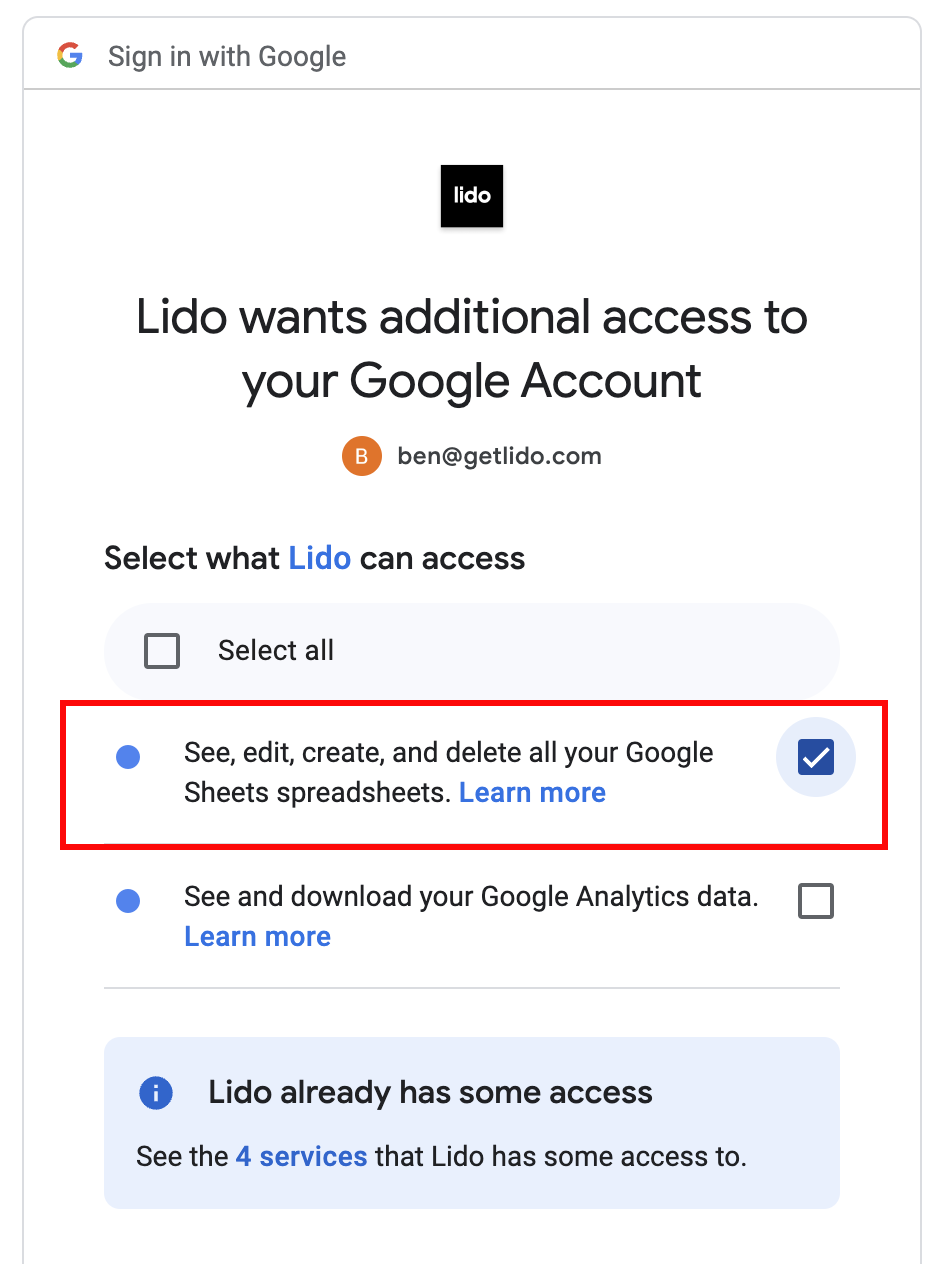
You will be asked to grant Lido permission to access your Google Sheets the first time. Make sure that you check the appropriate box as shown here.

Next, select the columns from your Google Sheet that you want to connect to Lido. Lido will automatically keep records updated from your Google Sheet, so don’t worry if you plan to add more records.
Click Add Data and your spreadsheet data has now been imported to Lido as a Table.

In a new worksheet, type in the subject line and body messages you want to send. You can reference different column names as variables using this syntax [@ColumnName]. For example:
We added our subject line and email body headers to column a and our messages in column B. We will use this email template for our mail merge from a google spreadsheet later.

Now let's make these messages dynamic for every row in your table. Go back to your table and add a Computed Column for "Subject".
A Computed Column is a special column type that will apply the same formula to every row.

The formula we want to use in the computed column is called STRINGTEMPLATE. This formula replaces fields in your templates ([@Column]) dynamically with the values for each row
The syntax for our Computed Column formula is:
=STRINGTEMPLATE(template_cell)
Where the template_cell is the cell address of the template that we just created.
**Remember to absolute anchor this reference like Sheet1!$A$1 since we want to use the same template for every row.
In our example, our formula for the new Subject column is:
What is looks like now is:

Now you have personalized Subject and Body values for each of your recipients!
Lido is better than Google Sheets for automation because of its unique Action formulas, which allow you to trigger things like emails and slack messages using spreadsheet formulas.
The formula to send an email from Lido is:
=SENDGMAIL(<sender-credential>, recipient, subject, body, status)
In our example this will be:
Sender = a credential you create for your@email.com (This should be associated with a Gmail or Google Apps account)
Recipient = Email in B2
Subject = D2
Body (message) = E2
Status = G2 (this is the cell location where you'll put the result for whether the email was sent successfully. This should be the cell that is one column to the right of wherever you're currently entering your SENDGMAIL formula)
Final Formula:
Create another computed column with this formula in column F.
Start typing =SENDGMAIL(. When you're in the first argument, click on the "+" to add a sender credential to your Gmail (or Google Apps) account.

When you've completed your SENDGMAIL formula, it should look something like this:

Next, we need to make a status column to keep track of whether we've already sent an email for the row. Create a new Linked column immediately next to the "Send the Email" column by typing "Status" in the first cell. This should be the same column that you specified in the status argument of your SENDGMAIL formula in step 5; update your formula if not. In our example it is column G.
For a Linked Column to work, you need to tie it to another column that is guaranteed to have unique values. For this example, we'll choose the email column as that will be expected to be unique. Timestamp columns are also good to use as the Unique ID if you have it.

We can quickly test this is working by Right clicking on an action cell and clicking Run Action to send an email. You’ll need to authenticate into the Gmail account used as the sender in your formula the first time. Notice how the status ("success") of the action gets added to the cell specified in the formula.

We don’t want to send emails to everyone, only those who have met our criteria for when a cell value has changed. Lido’s action formulas work with all other spreadsheet formulas, so we can create an IF statement to make this work.
In this example, we only want to send emails if our Task Done column is TRUE. We will add an IF statement to our SENDGMAIL formula to reflect this:
=IF(condition=TRUE, SENDGMAIL(<sender-credential>, recipient, subject, body))
Our new formula will now be:

You can now see that the action only appears in the column for the row where column C = TRUE.
And now finally, we need to update the IF statement logic in our Send Emails column so if an email has already been sent for that row, we don't display the SENDGMAIL formula. This will ensure that an email only gets sent once when a cell value changes when you automate this column in the next step.
We want to make sure we only send one email to each recipient. To do this, we'll check the Status cell to see if an email has already been sent.
We'll do this by adding another condition to our IF statement using AND.
=IF(AND(condition=TRUE, status_cell<> “success”), SENDGMAIL(<sender-credential>, recipient, subject, body, status_cell))
Where status_cell is the location of the cell in your status column. This should match the status_cell argument specified in your SENDGMAIL formula.
Our formula in cell F2 for example will now be:

As you can see here, row 5 has an Action to run because column C is both TRUE and an email has not been sent. However, while row 6 is TRUE in column C, there is no email to send because the status column already displays success.
Now that everything is working in our spreadsheet, the last step is to create an automation so everything will run silently in the background.
Click on the menu icon in your Send Email column, then select Run column on a schedule.

This will open the Lido automation panel.

In this example, every day at 10am Lido will pull in the latest data from Google Sheets, check to see if there are any actions to run based on our IF statement, and trigger all actions that are present in our Send Email column.
We will also show you how to send email based on cell value using google apps script by first importing a list of email addresses from a google form to google sheets or microsoft excel.

For this example, we want to be able to send email messages to our customers when we update their status to “Shipped” in Column E.

This will open a new tab, wherein we can create a code to send emails on Google Sheets.
function sendMailEdit(e){
if (e.range.columnStart != 5 || e.value != "Shipped") return;
const rData = e.source.getActiveSheet().getRange(e.range.rowStart,1,1,4).getValues();
let itemsOrdered = rData[0][2];
let email = rData[0][0];
let name = rData[0][1];
let trackingNo = rData[0][3];
let msg = "Hello, " + name + ". Your order: " + itemsOrdered + " is for shipping with tracking number " + trackingNo + ". Thank you for your purchase."
MailApp.sendEmail(email, "Shipped Order", msg)
}

This is how our code runs:


The email should be sent to its intended recipient after your Google Sheets spreadsheet loads and saves.

You can adjust the code to other cell values as needed to be able to trigger an email as they are changed. You can also edit the same code and trigger to send email to you or anyone else who needs to be notified regarding the changes in your Google Sheets. Here’s a simple guide on how to do this:
In this example an email will be sent to you or other team members when a value is changed. In every instance that a status is updated to “Shipped”, the team will be notified of the movement.
function sendEditNotification(e){
if (e.range.columnStart != 5 || e.value != "Shipped") return;
const rData = e.source.getActiveSheet().getRange(e.range.rowStart,1,1,4).getValues();
let itemsOrdered = rData[0][2];
let email = "YourEmailHere@gmail.com";
let name = rData[0][1];
let trackingNo = rData[0][3];
let msg = "Order with tracking number " + trackingNo + " has been updated to shipped."
MailApp.sendEmail(email, "Order Movement", msg)

In this code, we’ve collapsed the contents of our previous function to make it easier to focus on our new function: sendEditNotification. In this code, remember to input your own email address or the email addresses of the people you want to notify in line 18 and edit the contents of the email message as necessary.


This can be used for simple email notifications, event reminders, order tracking and more. Since we have both sendMailEdit and sendEditNotification functions in place, these will trigger the creation of the email message simultaneously so that both recipient and owners are updated at the same time. Using this send email generator in Google Sheets can make your data handling easier and open up a whole new world of possibilities.
*Note you can also send email notification messages based on a cell value from microsoft outlook by using the =SENDOUTLOOK() formula instead of =SENDGMAIL()
Be sure to also check out our article on how to send emails from Google Sheets.
Convert Currency in Google Sheets (Easiest Way 2025)
Google Sheets Loan Payment Formula: How to Use It in 2025


