In this article you will learn how to get email notifications for new responses in Typeform in just a few clicks. Simply follow the steps below.
If you'd rather follow a step-by-step video walkthrough, click here.
Lido is a new spreadsheet based workflow automation tool. If you don't already have an account, you can create one for free at: www.lido.app/go/signup.
Then follow these steps:

Click Add Data. This will create a Lido table of your Typeform responses.
In this step we'll tailor our email notification content, including which details from the Typeform responses should be incorporated into our email notifications.
Set up a new worksheet for your notification templates. Utilize the [@Column] syntax to reference various columns as variables. This method allows you to easily insert information from new Typeform responses directly into your email notifications.
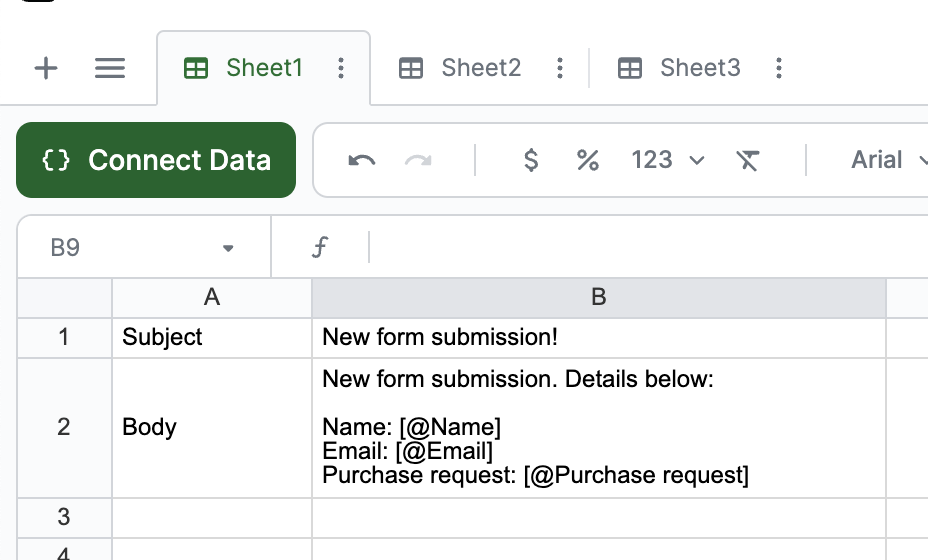
Next, let's connect our recently crafted templates with our form response table. Return to your table and add a new computed column named “Subject”.

In the new column, enter the formula:
```=STRINGTEMPLATE(Sheet1!$B$1)```
Replace Sheet1!$B$1 with the actual cell where the email notification subject template from step 3 is located.
Create another computed column and do the same thing for email body:
```=STRINGTEMPLATE(Sheet1!$B$2)```
Again, remember to replace Sheet1!$B$2 with the location of your email body template.
At this point, your table should appear as shown below. Observe how the variables [@Column] have been substituted with the real values from the corresponding form responses for each row.

We'll use Lido's special SENDGMAIL formula to send emails. If you use Outlook instead of Gmail, you can use the =SENDOUTLOOK() formula everywhere you see Gmail below. The formulas are otherwise identical.
Now, make a new column in your spreadsheet. In the second row of that column, put in this formula:
```=SENDGMAIL(<sender-credential>, "recipient@email.com", E2, F2, H2)```
Here is what each part does:
Sender-credential: This is the email address notifications will be sent from. You'll need to log into the account the first time you set up this formula.
Recipient: “recipient@email.com”, this is the email address notifications will be sent to
Subject: E2, this is the email subject
Body: F2, this is the email body
Status: H2, this is the spreadsheet cell where the result of whether the email has been sent will be displayed
Make sure to replace the different cell locations in the formula with the actual cells in your spreadsheet.
You can also send an email to an address from your form by putting the cell location (like C2) in the second part instead of "recipient@email.com." If you want to notify multiple people of new form responses, you can use ARRAY("recipient1", "recipient2", "recipient3") in the formula's recipient section.
You should now have a column of SENDGMAIL Action formulas. Right click on the SENDGMAIL and Run action to send a test email.

Once the email is sent successfully, you'll notice a "success" message briefly appear in the cell. The cell you designated as the status cell will also be updated to display "success."

Now we need to ensure that only one notification email is sent per new form response.
First, add a Linked Column to your table to keep track of notification sent status. You will be prompted to choose an ID column; we recommend selecting Timestamp. If you did not connect the timestamp column, you can click Edit data and go back to the data browser to add it.

The location of your status column must be the same as the location specified in the status_cell for your SENDGMAIL formula (column H in this example). Update your SENDGMAIL formula as needed.
Now we need to add an IF statement to our SENDGMAIL formula so that it only displays if an email notification has not already been sent for that response row.
```=IF(H2<>”success”,SENDGMAIL(<sender-credential>, “recipient@email.com”, E2, F2, H2))```

The SENDGMAIL formula will now only display if an email has not already been successfully sent.
The last step is to automate running all of the SENDGMAIL formulas in the column. Click on the column header and select Run column on a schedule.

This will open the automation panel. Select how frequently you want to check for updates. On each automation interval, Lido will pull in your latest form submissions and send notifications. In this example we will select 15 minutes.

Click Save. Then you are all set!
Now, when a new Typeform response is submitted, Lido will automatically fetch the information and send an email notification.
We hope that you now have a better understanding of how to set up email notifications for new Typeform responses!